Goal
This tutorial will teach you how to periodically import French cities from an external HTTP API into eZ contents with Dataflow and eZ Dataflow.
Install eZ Platform 2.5
To follow this tutorial, you just need to use the latest version of eZ Platform 2.5. You can follow this guide to install a new instance on your computer. Alternatively, you can also use eZ launchpad with Docker to quickly set up a complete eZ Platform stack.
Install Dataflow and eZ Dataflow
To install the bundles, use composer
$ composer require code-rhapsodie/dataflow-bundle code-rhapsodie/ezdataflow-bundle
add those two lines in the app/AppKernel.php file:
new CodeRhapsodie\DataflowBundle\CodeRhapsodieDataflowBundle(),
new CodeRhapsodie\EzDataflowBundle\CodeRhapsodieEzDataflowBundle(),
And import the routing:
_cr.dataflow:
    resource: '@CodeRhapsodieEzDataflowBundle/Resources/config/routing.yaml'
Add the City content type
In your eZ Platform admin UI, add a new content type with these parameters:
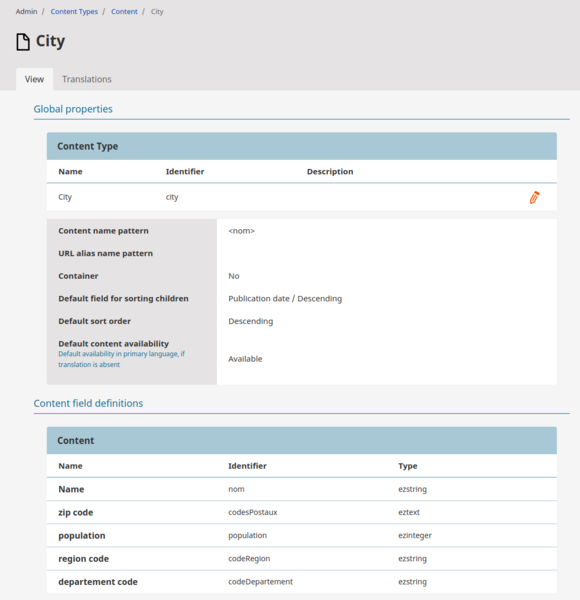
Write the reader for Geo API
The reader must return an iterable. In this tutorial, we use a generator.
The reader calls the french government API to download in JSON format the cities list. After JSON decoding, the reader yields each object representing a French city.
Make a new folder Service in src/AppBundle and add a new PHP class named GeoClient .
<?php

namespace AppBundle\Service;

use GuzzleHttp\Client;
class GeoClient
{
    private $client;
    public function __construct(Client $client)
    {
        $this->client = $client;
    }

    public function read($url): iterable
    {
        $response = $this->client->get($url);
        $result = json_decode($response->getBody()->getContents(), true);
        if (false === $result) {
            return [];
        }
        foreach ($result as $row) {
            yield $row;
        }
    }
}
Now you need to configure the Guzzle HTTP client like this:
services:
    # [...]
    guzzle.client:
        class: GuzzleHttp\Client
This tutorial assumes auto-wiring is enabled for all your services.
Define the DataflowType and add the reader
Now, it's time to write the DataflowType class. Add a new folder named DataflowType in the folder src/AppBundle and add a new class named FrenchCitiesDataflow
The Dataflow bundle provides an abstract class CodeRhapsodie\DataflowBundle\DataflowType\AbstractDataflowType to help you to write your dataflow type.
So, your class like this:
<?php
namespace AppBundle\DataflowType;

use CodeRhapsodie\DataflowBundle\DataflowType\AbstractDataflowType;
use CodeRhapsodie\DataflowBundle\DataflowType\DataflowBuilder;
class FrenchCitiesDataflow extends AbstractDataflowType
{
    protected function buildDataflow(DataflowBuilder $builder, array $options): void
    {
    }
    public function getLabel(): string
    {
        return "French cities";
    }
}
The getLabel function returns the Dataflow name to be displayed in the eZ Platform admin UI.
To define the reader into the dataflow builder, you need to inject it as a dependency in this class constructor.
Now, your class looks like this:
<?php
namespace AppBundle\DataflowType;
use AppBundle\Service\GeoClient;
use CodeRhapsodie\DataflowBundle\DataflowType\AbstractDataflowType;
use CodeRhapsodie\DataflowBundle\DataflowType\DataflowBuilder;
class FrenchCitiesDataflow extends AbstractDataflowType
{
    /**
     * @var GeoClient
     */
    private $geoClient;
    public function __construct(
        GeoClient $geoClient
    ) {
        $this->geoClient = $geoClient;
    }
    protected function buildDataflow(DataflowBuilder $builder, array $options): void
    {
        $builder->setReader($this->geoClient->read($options['url']));
    }
}
Add all dataflow steps
A step is a callable who has one and only one responsibility. For this tutorial, I need two steps:
- One filter to reject all data array lacking the keys codesPostaux and population .
- One step to transform the array data into a ContentStructure.
This code shows that filter as an anonymous function:
// [...]
protected function buildDataflow(DataflowBuilder $builder, array $options): void
    {
        $builder->setReader($this->geoClient->read($options['url']))
            // This step is a filter
            ->addStep(function ($data) {
                if (empty($data['codesPostaux']) || empty($data['population'])) {
                    //reject data
                    return false;
                }
                return $data;
            });
    }
// [...]
This code is an anonymous function prepating data and calling the ContentStuctureFactory provided by eZ Dataflow bundle:
//[...]
protected function buildDataflow(DataflowBuilder $builder, array $options): void
    {
        $builder->setReader($this->geoClient->read($options['url']))
            // This step is a filter
            ->addStep(function ($data) {
                if (empty($data['codesPostaux']) || empty($data['population'])) {
                    //reject data
                    return false;
                }
                return $data;
            })
            // This step transform the data in content structure
            ->addStep(function ($data) use ($options) {
                $remoteId = sprintf('french-city-%d', $data['code']);
                unset($data['code']);
                $data['codesPostaux'] = implode(',', $data['codesPostaux']);
                return $this->contentStructureFactory->transform(
                    $data,
                    $remoteId,
                    $options['language'],
                    $options['content_type'],
                    $options['parent_location_id']
                );
            });
    }
//[...]
Define the writer
In your dataflow, you can define more than one writer. All writers must implements this interface CodeRhapsodie\DataflowBundle\DataflowType\Writer
WriterInterface
.
eZ Dataflow bundle provides a generic writer CodeRhapsodie\EzDataflowBundle\Writer\ContentWriter to save content structures as eZ contents. This writer is available as a service.
In this tutorial, we use this generic writer:
//[...]
use CodeRhapsodie\EzDataflowBundle\Writer\ContentWriter;
//[...]
class FrenchCitiesDataflow extends AbstractDataflowType
{
    /**
     * @var ContentWriter
     */
    private $contentWriter;
// [...]
    public function __construct(
        GeoClient $geoClient,
        ContentWriter $contentWriter,
        ContentStructureFactory $contentStructureFactory
    ) {
        $this->geoClient = $geoClient;
        $this->contentWriter = $contentWriter;
        $this->contentStructureFactory = $contentStructureFactory;
    }
    protected function buildDataflow(DataflowBuilder $builder, array $options): void
    {
        //[...]
        $builder->addWriter($this->contentWriter);
    }
}
Define options needed to run
In order to run this dataflow, some options must be defined by the user:
- the API URL where the reader can download the JSON data.
- the identifier of the content type used to create new contents.
- the id of parent location where contents will be created.
- the language used to save the content
The AbstractDataflowType provides a protected function that lets you define the options using the OptionsResolver.
The completed function looks like this:
    protected function configureOptions(OptionsResolver $optionsResolver): void
    {
        $optionsResolver->setDefaults([
            'url' => null,
            'content_type' => null,
            'parent_location_id' => null,
            'language' => 'eng-GB'
        ]);
        $optionsResolver->setRequired(['url', 'content_type', 'parent_location_id']);
    }
Full dataflow
The completed FrenchCitiesDataflow class:
<?php
namespace AppBundle\DataflowType;
use AppBundle\Service\GeoClient;
use CodeRhapsodie\DataflowBundle\DataflowType\AbstractDataflowType;
use CodeRhapsodie\DataflowBundle\DataflowType\DataflowBuilder;
use CodeRhapsodie\EzDataflowBundle\Factory\ContentStructureFactory;
use CodeRhapsodie\EzDataflowBundle\Writer\ContentWriter;
use Symfony\Component\OptionsResolver\OptionsResolver;
class FrenchCitiesDataflow extends AbstractDataflowType
{
    /**
     * @var ContentWriter
     */
    private $contentWriter;
    /**
     * @var ContentStructureFactory
     */
    private $contentStructureFactory;
    /**
     * @var GeoClient
     */
    private $geoClient;
    public function __construct(
        GeoClient $geoClient,
        ContentWriter $contentWriter,
        ContentStructureFactory $contentStructureFactory
    ) {
        $this->geoClient = $geoClient;
        $this->contentWriter = $contentWriter;
        $this->contentStructureFactory = $contentStructureFactory;
    }
    protected function buildDataflow(DataflowBuilder $builder, array $options): void
    {
        $builder->setReader($this->geoClient->read($options['url']))
            // This step is a filter
            ->addStep(function ($data) {
                if (empty($data['codesPostaux']) || empty($data['population'])) {
                    //reject data
                    return false;
                }
                return $data;
            })
            // This step transform the data in content structure
            ->addStep(function ($data) use ($options) {
                $remoteId = sprintf('french-city-%d', $data['code']);
                unset($data['code']);
                $data['codesPostaux'] = implode(',', $data['codesPostaux']);
                return $this->contentStructureFactory->transform(
                    $data,
                    $remoteId,
                    $options['language'],
                    $options['content_type'],
                    $options['parent_location_id']
                );
            })
            ->addWriter($this->contentWriter);
    }
    public function getLabel(): string
    {
        return "French cities";
    }
    protected function configureOptions(OptionsResolver $optionsResolver): void
    {
        $optionsResolver->setDefaults([
            'url' => null,
            'content_type' => null,
            'parent_location_id' => null,
            'language' => 'eng-GB'
        ]);
        $optionsResolver->setRequired(['url', 'content_type', 'parent_location_id']);
    }
    public function getAliases(): iterable
    {
        return ['fc'];
    }
}
To run a dataflow, use the Symfony command code-rhapsodie:dataflow:execute with the dataflow type FQCN or one of its aliases. Aliases for dataflow types are defined by overriding the getAliases function.
Check the Symfony configuration
Now, we can check if Symfony has your dataflow type registered as a service.
bin/console debug:container --tag coderhapsodie.dataflow.type --show-private
The output console looks like this:

If your dataflow is not in the output, check if your service uses Symfony auto-configuration. If you don't use auto-configuration, check if the dataflow type class is correctly configured in your service.yml file with the tag coderhapsodie.dataflow.type .
Add the Symfony command into crontab
To run dataflow when you need, define for each dataflow a first execution date and time and a frequency. This informations are stored into the database.
To actually execute all dataflow job, schedule this command every 5 minutes in your crontab:
/path/to/your/project/bin/console code-rhapsodie:dataflow:run-pending
This command checks and executes each dataflow job waiting to be executed according to the frequency.
Define the dataflow schedule
To define a dataflow schedule, you have two ways:
- Use Symfony console command code-rhapsodie:dataflow:schedule:add .
- Use eZ Platform back-office with a module provided by eZ Dataflow bundle.
Log in in the admin UI, then click on "Admin" on the top, and "eZ Dataflow" just on the line below.
On the new page, click on the "+" button to open the schedule pop in.
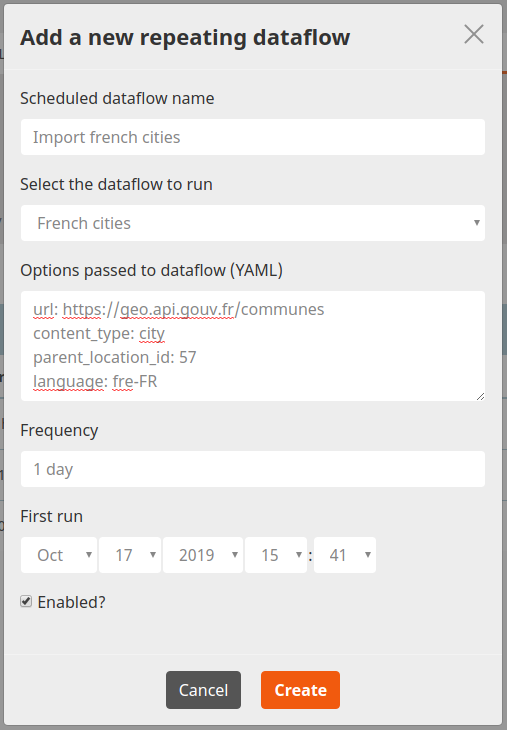
Fill in all fields. Keep in mind that the "Options" field must contain valid YAML.
Check the import
On eZ Dataflow back-office page, the scheduled dataflow list contains one line. This job will be executed automatically by the Symfony command previously added in the crontab.
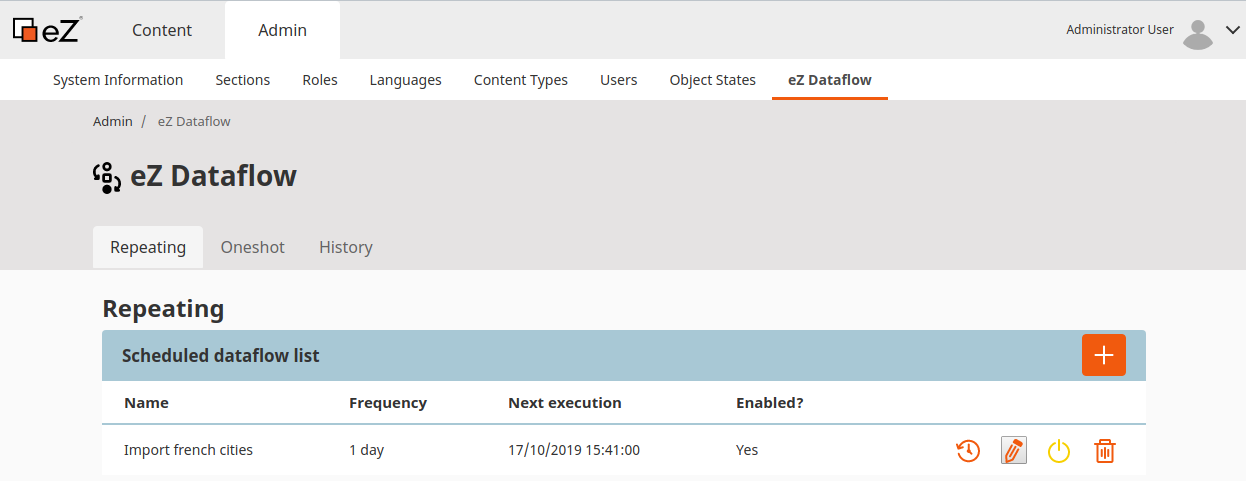
To display the job history for this dataflow schedule, click on the rounded back arrow icon:
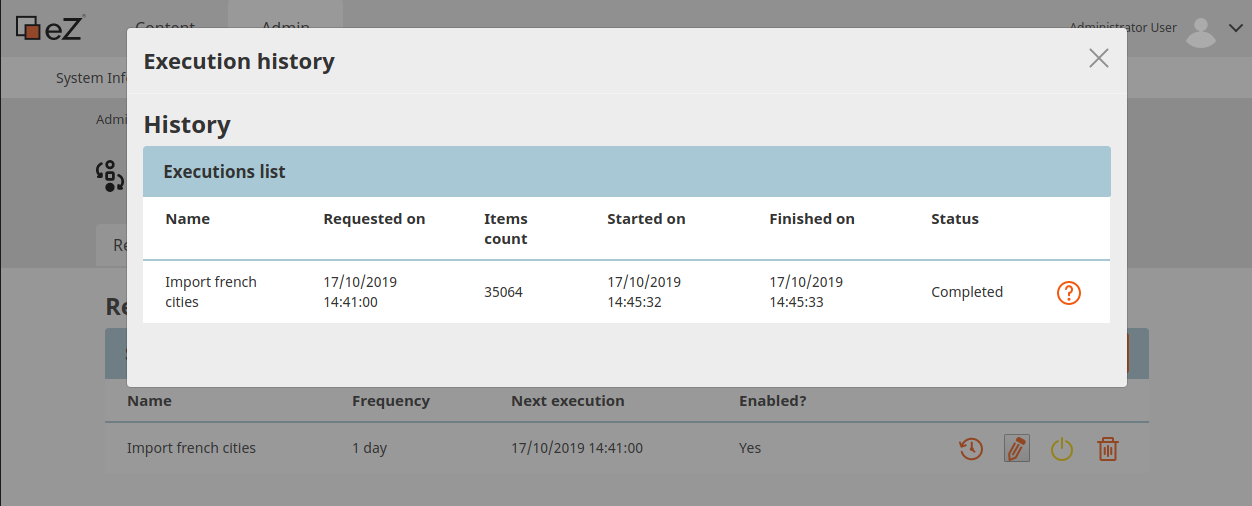
On the list displayed into the pop in, click on the rounded back arrow icon to read the job details:
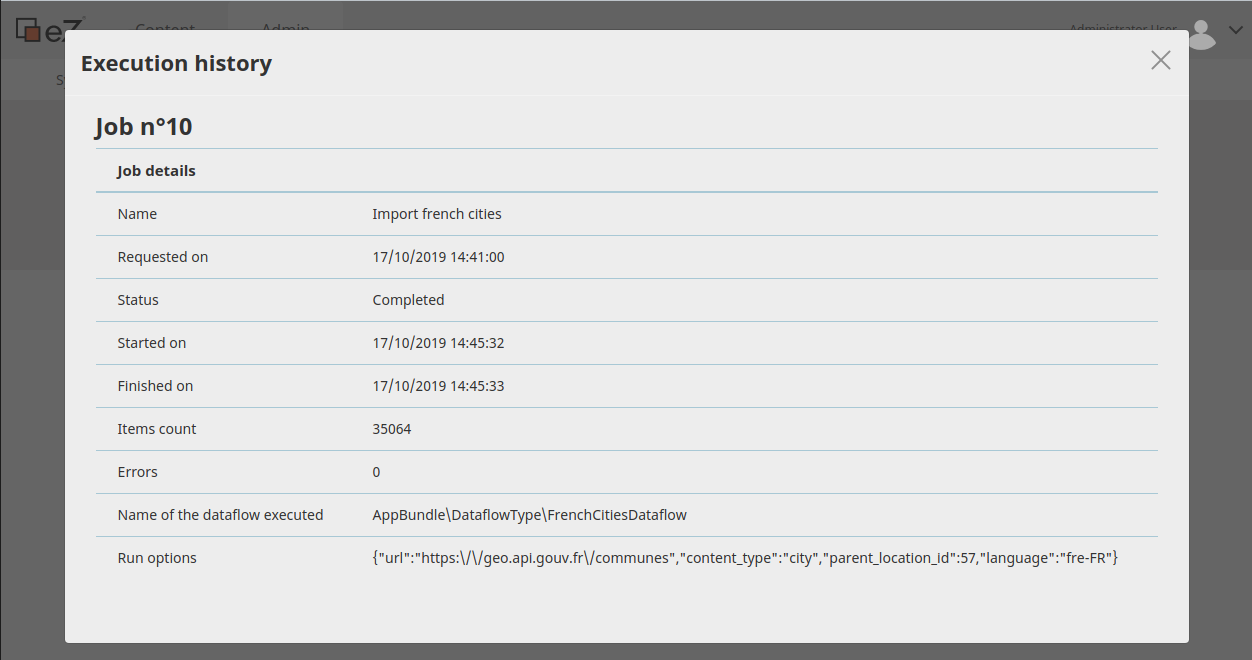
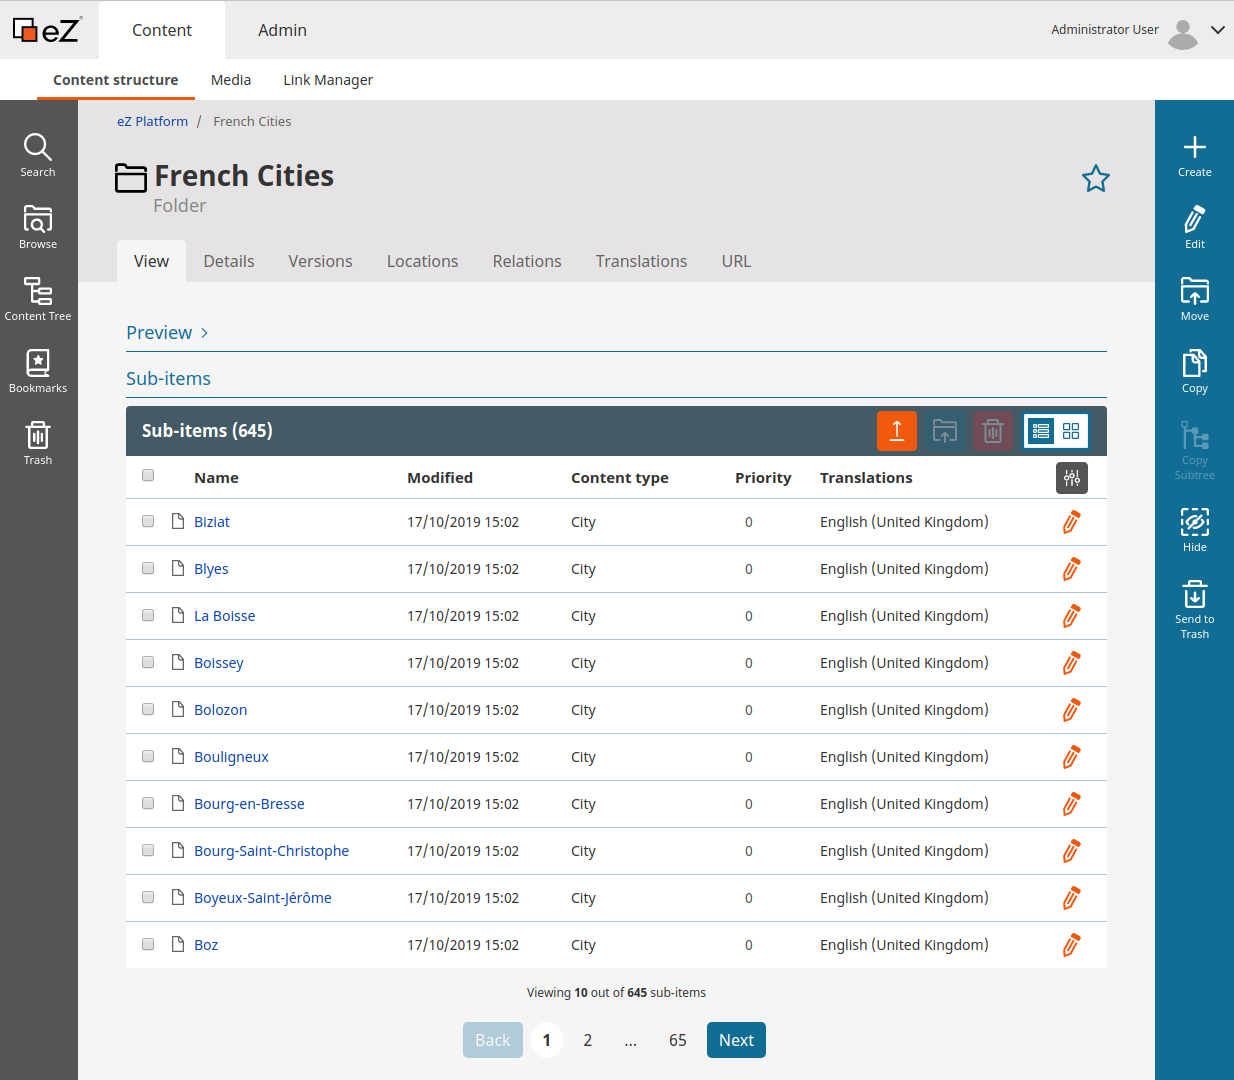
After reading the job details, you can go to the content to view all imported contents. Click on "Content" on the page top, and "Content structure" just on the line below.
Browse to the parent content and read the "sub-items" section:
Conclusion
In this tutorial, you learned how to:
- Install Dataflow and eZ Dataflow on your eZ Platform 2.5 web site.
- Configure Symfony to enable these bundles.
- Implement one dataflow.
- Schedule this dataflow.
- Run all pending jobs in the background with Cron.
- Check the job result.
PS: This repository contains samples of code from this tutorial
Nos derniers articles
Ibexa annonce la sortie d'une nouvelle version LTS avec les contributions de Code Rhapsodie
Ibexa a publié un avis de sécurité le 10 décembre 2025 et sortie dans la ...

Le nom des zones du Page Builder d'Ibexa DXP est-il adapté aux contributeurs ?
L'adéquation des noms attribués aux différentes zones dans le Page Builder d'Ibexa DXP est-elle optimale ...


Connecteur Google Gemini pour les actions IA d'Ibexa
Connaissez-vous les Actions IA (AI Actions) d'Ibexa ? Les AI Actions, sont une solution extensible ...


Notre équipe est certifiée à 100% Ibexa
Experts Ibexa de longue date, forts de nombreux projets réussis sur Ibexa, eZ Publish et ...


Profitez d'une certification gratuite lors de l'Ibexa Summit 2025
La conférence annuelle Ibexa se tiendra les 30 et 31 janvier 2025 à Barcelone et ...


Migrer les mots de passe d'eZ Platform 2.5 vers Ibexa 4.6
La sécurité des données, et en particulier des mots de passe des utilisateurs, est une ...


✨🎄Code Rhapsodie vous souhaite le meilleur en 2025 🥂🍾🎊
2024 aura été une année riche en tempêtes, avec ses hauts et ses bas. Mais ...


Structurer le code de vos processus d'import / export avec Dataflow
Pour célébrer la sortie de Dataflow 5 pour Symfony 7, voici un retour d'expérience sur ...


Gagnez un audit de votre application !
🎯 Nous relevons le défi de lancer un grand concours : Vous faire gagner un ...


Ibexa annonce la sortie d'une nouvelle version LTS avec les contributions de Code Rhapsodie
Ibexa a publié un avis de sécurité le 10 décembre 2025 et sortie dans la ...


Le nom des zones du Page Builder d'Ibexa DXP est-il adapté aux contributeurs ?
L'adéquation des noms attribués aux différentes zones dans le Page Builder d'Ibexa DXP est-elle optimale ...

Connecteur Google Gemini pour les actions IA d'Ibexa
Connaissez-vous les Actions IA (AI Actions) d'Ibexa ? Les AI Actions, sont une solution extensible ...


Notre équipe est certifiée à 100% Ibexa
Experts Ibexa de longue date, forts de nombreux projets réussis sur Ibexa, eZ Publish et ...


Profitez d'une certification gratuite lors de l'Ibexa Summit 2025
La conférence annuelle Ibexa se tiendra les 30 et 31 janvier 2025 à Barcelone et ...


Migrer les mots de passe d'eZ Platform 2.5 vers Ibexa 4.6
La sécurité des données, et en particulier des mots de passe des utilisateurs, est une ...


✨🎄Code Rhapsodie vous souhaite le meilleur en 2025 🥂🍾🎊
2024 aura été une année riche en tempêtes, avec ses hauts et ses bas. Mais ...


Structurer le code de vos processus d'import / export avec Dataflow
Pour célébrer la sortie de Dataflow 5 pour Symfony 7, voici un retour d'expérience sur ...


Gagnez un audit de votre application !
🎯 Nous relevons le défi de lancer un grand concours : Vous faire gagner un ...


